Creating a GitHub Account
Create a personal GitHub account if you don't have one yet.
Choose a sensible GitHub username as you are likely to use it for years to come in professional contexts e.g., in job applications.
Recommended (but not required): Complete your GitHub profile. In particular,
- Specify your name.
- Upload a profile photo that matches our requirements.
Please do not change your GitHub username during the semester/exam/grading period as it can cause our auto-grading scripts to miss your GitHub activities. If you change your GitHub username during that period due to an unavoidable reason, please let us know immediately.
Guidelines for Reviewing PRs
Follow the Best practices for reviewing PRs @SE-EDU/guides. You are expected to follow all of them.
tP Team Organization Setup
Please follow the organization/repo name format precisely or else our grading scripts will not be able to detect your work.
(/) Only one team member:
After receiving your team ID, one team member should do the following steps:
- Create a GitHub organization with the following details:
- Organization name (all UPPER CASE) :
AY2425S1-TEAM_ID. e.g.AY2425S1-CS2103T-W12-1,AY2425S1-CS2103-T09-2 - Plan: Open Source ($0/month)
- This organization belongs to: My personal account
- Organization name (all UPPER CASE) :
- Add members to the organization:
- Create a team called
developersto your organization. - Add your team members to the developers team.
- Create a team called
tP Team Repo Setup
(/) Only one team member:
Fork the https://github.com/nus-cs2103-AY2425S1/tp repo to your team org.
- This repo (let's call it the team repo) is to be used as the repo for your project.
- Please do not rename the fork Reason: our grading scripts rely on the repo name.
Enable the issue tracker.
Enable GitHub Actions: Go to the Actions tab and enable workflows by clicking the button (or the button). That will enable the GitHub Actions that are already included in the repo you forked.
Set up codecov, as explained in the DevOps guide.Set up the project website
There are two options for the project website: Jekyll, MarkBind. You can choose either one. More info are given in the panels below:
When set up correctly, your project website should be available via the URL https://ay2425s1-{team-id}.github.io/tp
e.g., https://ay2425s1-cs2103-w13-1.github.io/tp.
- Add members. Ensure your team members have the desired level of access to your team repo.
Recommended: Give admin access to 1-2 members and write access to others. - Create a team PR for us to track your project progress: i.e., create a PR from your team repo
masterbranch to [nus-cs2103-AY2425S1/tp]masterbranch. PR name:[Team ID] Product Namee.g.,[CS2103-T09-2] InsureList. As you merge code to your team repo'smasterbranch, this PR will auto-update to reflect how much your team's product has progressed.
Please fill in these details as specified because they are used by our grading scripts.- PR subject: the name of your product e.g.,
[CS2103-T09-2] InsureList - Description: a 1-2 sentence overview (plain text only, no formatting or links) of your project indicating the target user and the value proposition e.g.,
InsureList helps insurance agents manage detail of their clients. It is optimized for CLI users so that frequent tasks can be done faster by typing in commands.
- PR subject: the name of your product e.g.,
- [Optional, recommended] Protect the
masterbranch: Use GitHub's Protected Branches feature to protect yourmasterbranch against rogue PRs. We suggest the following:- Go the the settings of your team repo.
- Click on the
Branchesoption on the navigation menu on the left. - Click the button. In the Branch protection rule page,
- Specify the Branch name pattern to be
master - Tick the option
Require status checks to pass before mergingto ensure that a branch has to pass CI before it can be merged into themasterbranch - If you think all PRs should be reviewed by someone other than the PR author before they are merged, also tick the
Require pull request reviews before mergingoption.
- Specify the Branch name pattern to be
tP Issue Tracker Setup
We recommend you configure the issue tracker of the tP team repo as follows:
- Delete existing labels
- Add the following labels.
Issue type labels are useful from the beginning of the project. The other labels are needed only when you start implementing the features.
Issue type labels:
type.Epic: A big feature which can be broken down into smaller stories e.g. searchtype.Story: A user storytype.Enhancement: An enhancement to an existing storytype.Task(ortype.Chore): Something that needs to be done, but not a story, bug, or an epic. e.g. Move testing code into a new foldertype.Bug: A bug
Priority labels:
priority.High: Must dopriority.Medium: Nice to havepriority.Low:Unlikely to do
Bug Severity labels:
severity.VeryLow: A flaw that is purely cosmetic and does not affect usage e.g., a typo/spacing/layout/color/font issues in the docs or the UI that doesn't affect usage. Only cosmetic problems should have this label.severity.Low: A flaw that is unlikely to affect normal operations of the product. Appears only in very rare situations and causes a minor inconvenience only.severity.Medium: A flaw that causes occasional inconvenience to some users, but they can continue to use the product.severity.High: A flaw that affects most users and causes major problems for users. i.e., only problems that make the product almost unusable for most users should have this label.
When applying for documentation bugs, replace user with reader.
Create following milestones :
v1.1v1.2v1.3v1.4v1.5v1.6You may configure other project settings as you wish. e.g. more labels, more milestones
tP Individual Fork Setup
(, , , ...) Every team member:
- Watch the
tpteam repo (created earlier) i.e., go to the repo and click on the button to subscribe to activities of the repo. - Fork the
tpteam repo to your personal GitHub account.
Please do not rename the fork Reason: our grading scripts rely on the repo name. - Clone the fork to your computer.
- Set up the developer environment in your computer by following the Setting up and getting started page of AB3 developer guide.
Do not alter these paths in your project as our grading scripts depend on them.
src/main/javasrc/test/javadocs
tP Project Schedule Tracking
For tP schedule tracking, our strategy is to leverage tools already available in the GitHub platform, rather than bring in an entirely separate tool for it. Given below is a summary of the most basic needs related to this aspect, and which GitHub tool is used for each.
| Tracking need | GitHub tool used |
|---|---|
| a WHAT needs to be done? i.e., project tasks | Tasks are posted as issues in the GitHub issue tracker. |
| b WHO should do which task? i.e., tasks assignment | Issues are given assignees. |
| c WHEN is a task to be done? i.e., task scheduling | Issues are assigned to a GitHub milestones, which in turn has a deadline. |
| d HOW is a task progressing? | PRs are created to match tasks in progress. Merging the PR (and closing of the matching issue) indicates task completion. |
| e HOW is an iteration progressing? | A GitHub milestone is used to track an iteration. A GitHub release represents the iteration deliverables. Closing the milestone indicates the completion of the iteration. |
[Optional] You can also use GitHub's Projects feature (which works like a layer on top of GitHub issues/PRs) to manage the project. If you do, keep it linked to the issue tracker as much as you can.
a Using issues to track project tasks
- Define project tasks as issues. When you start implementing a feature/fix/enhancement etc., break it down to smaller tasks if necessary. Define reasonably sized, standalone tasks. Create issues for each of those tasks so that they can be tracked.
- A typical task should be small enough for one person to do in a few hours. eg.,
- Bad:
Write the Developer Guide(reasons: not a one-person task, not small enough) - Good:
Implement parser support for adding events
- Bad:
- A typical task should be small enough for one person to do in a few hours. eg.,
- Ensure the issue details are 'good enough':
- Write a descriptive title for the issue.
- Bad:
Update parser(reason: not specific enough) - Good:
Add support for the 'undo' command to the parser
- Bad:
- Assign the
type.*andpriority.*labels, if applicable. - Omit redundant details.
- There is no need for well-crafted and detailed descriptions for tasks. A minimal description is enough.
- If the issue title is enough to describe the task, no need to repeat it in the issue description.
- Similarly, labels such as
prioritycan be omitted if you think they don't help you.
- Write a descriptive title for the issue.
- No need to track things taken for granted. e.g.,
push code to repo(reason: it is taken for granted that the code author will push the code to the repo). - Ensure issues are compliant with the breadth-first iterative approach. That is, a code merge to the
masterbranch should take the product from a working version to a slightly better working version.- Bad:
Add all data classes(reason: this is the depth-first approach) - Good:
Support adding simple todo tasks
- Bad:
Using issues to track user stories
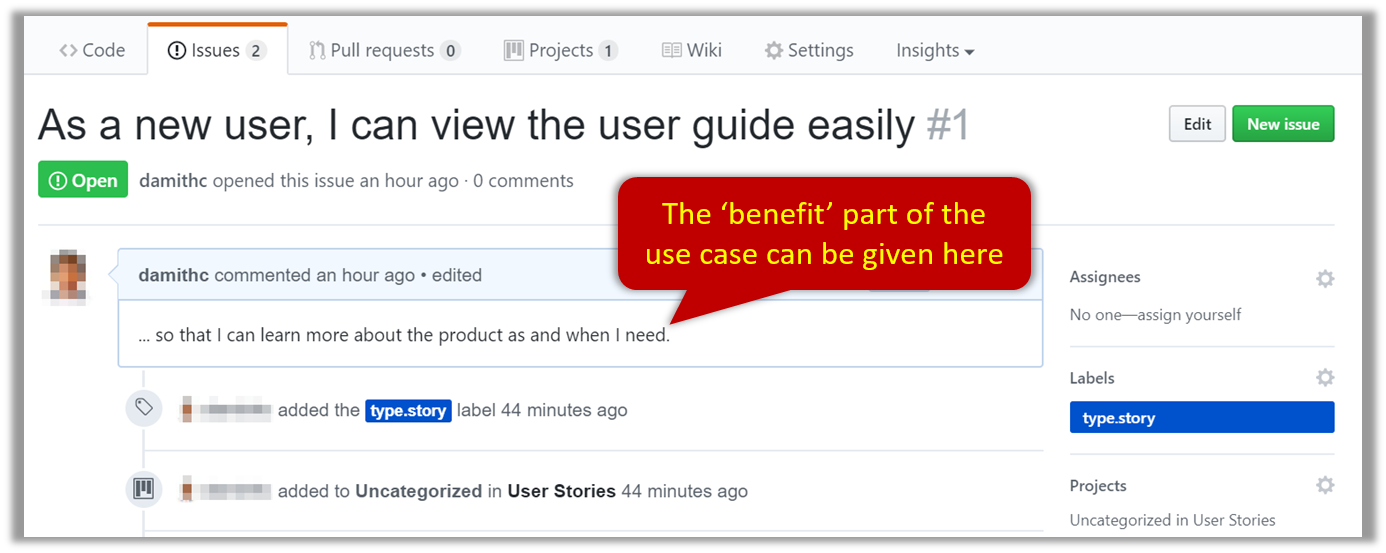
In our project, we use user stories to track user requirements. Instead of using a separate tool for tracking requirements, we can use the GitHub issue tracker for this as well. To do that, record each user story as an issue in the issue tracker. More details (taken from the textbook) are given below. It is optional to use the GitHub issue tracker for recording user stories.
You can break the user story into issue subject and description as follows:
| title | As a user I can add a deadline |
|---|---|
| Description | ... so that I can keep track of my deadlines |
Alternatively, you can put the entire user story in the description.
| title | Add deadline |
|---|---|
| Description | As a user I can add a deadline so that I can keep track of my deadlines |
In both cases, apply the type.Story (or the type.Epic) label.
b Using issue assignees to track task allocation
- Assign the issue to a team member after you've decided who should do the corresponding task.
c Using milestones for task scheduling
Create GitHub milestones, to represent upcoming iterations of your project.
Allocate the issues (and corresponding PRs) to a milestone, to indicate which tasks will be done in that milestone. As milestones have deadlines, this also indicates when those tasks will be done.
d Using PRs to track task progress
Creating PRs:
- Create a PR when you implement a project task that updates the code.
- Use the forking workflow when creating PRs in early iterations (you can switch to the feature branch workflow after completing v1.3 if you wish).
ALERT This means each PR should come from a separate branch of your fork (i.e., not themasterbranch), as that is an essential part of the forking workflow. - Suggestion: Make the PR title same as the title of the corresponding issue (for easier matching between PRs and issues).
- You can use GitHub's draft PRs feature to indicate that a PR is not yet ready for merging.
- You can use GitHub's
Fixes #123trick to get the issue to close automatically when the PR is merged.
- Use the forking workflow when creating PRs in early iterations (you can switch to the feature branch workflow after completing v1.3 if you wish).
- Assign the PR to a milestone. This allows the PR to become visible under the milestone progress.
There is no need to assign the PR to a person. The PR author is considered as the owner of the PR. - While waiting for one PR to be merged, you can send more PRs. If you do, remember to use a separate branch for each PR, and try to reduce overlaps between parallel PRs (so that each can be reviewed/merged independently of the others).
Reviewing PRs:
- Get team members to review PRs, to reduce the risk of problematic code, but also, to practice the important skill of reviewing code.
- You can request review from specific team members, to expedite the PR progress.
- When reviewing others' PRs:
- Follow the Best practices for reviewing PRs @SE-EDU/guides.
- Give comments at specific locations of the code changes, in addition to adding an overall comment for the entire PR. Reason: location-specific comments are valued more in grading.
-
LGTMis common abbreviation you can use in the review comments to meanLooks Good To Me.
Merging PRs:
- Do not merge PRs failing . The CI status of a PR is reported at the bottom of the conversation tab of the PR page. Here's an example:
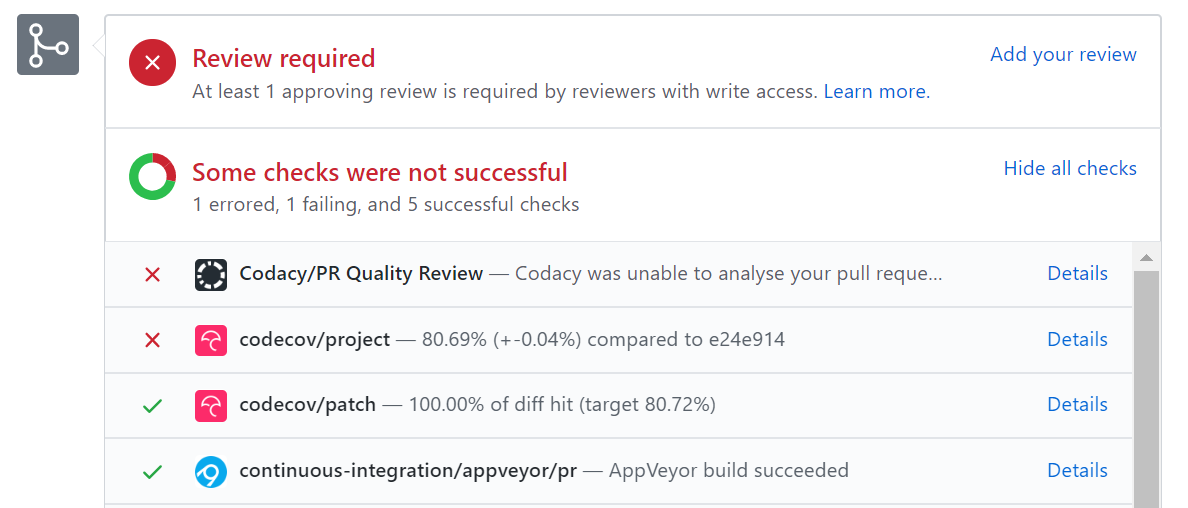
- If there is a failure, you can click on the
Detailslink in corresponding line to find out more about the failure. Once you figure out the cause of the failure, push a fix to the PR. - An exception to this guideline is when the failure is confirmed to be due to something you can afford to ignore e.g., when CI fails due to a drop in code coverage but the code section that is causing the coverage drop is not practical to be covered by automated tests, or you plan to write the relevant tests at a later time.
- If there is a failure, you can click on the
- Avoid rebasing/squashing when merging PRs. While both are good alternatives to the default behavior of creating a merge commit, rebasing/squashing can affect the timestamp of the commits, which can interfere with the progress tracking that we do for grading purposes i.e., the commits can get detected under a week different from the week they were actually done.
- After merging a PR,
- close the corresponding issue (which should happen automatically, if you followed this trick).
- sync your individual repos/forks with the team repo as follows:
- Pull the latest
masterfrom the team repo, and push it to your own fork. - If there are any unmerged branches in your local repo, for each of them,
mergemasterbranch to it, and push the updated branch to your fork.
Another way to sync a branch with themasterbranch is to rebase it. But we discourage that approach as it will change the timestamp of your branch commits, affecting how our grading scripts track your work.
- Pull the latest
- don't delete the branch used by the PR. While it is common practice to delete a branch after merging it, we require you to keep those branches in the team repo so that our scripts can confirm that you used branches when adding changes.
e Using milestones to track iteration progress
At the start of the iteration:
- Create milestones to represent the iteration. For example, if your next iteration will produce the version
v1.2of the product, we can create a milestone namedv1.1(for convenience, we use the product version as the milestone name as well). - Set a deadline for the milestone. This can be earlier than the deadlines set by the course, to give you a buffer.
- Create issues for tasks to be done in that iteration.
Assign them to team members.
Assign them to the milestone.
During the iteration:
- Ensure incoming PRs are assigned to the milestone as well.
Review and merge PRs, and ensure the corresponding issue is closed when the PR is merged. - Adjust iteration targets as necessary, by assigning new issues/PR to the milestone, or removing them from the milestone.
At the end of the iteration:
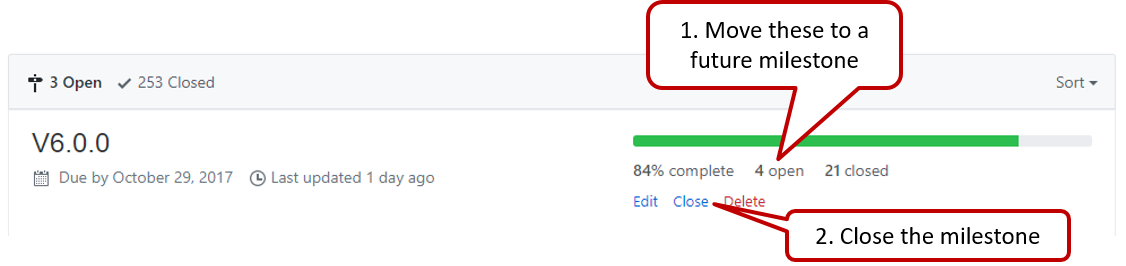
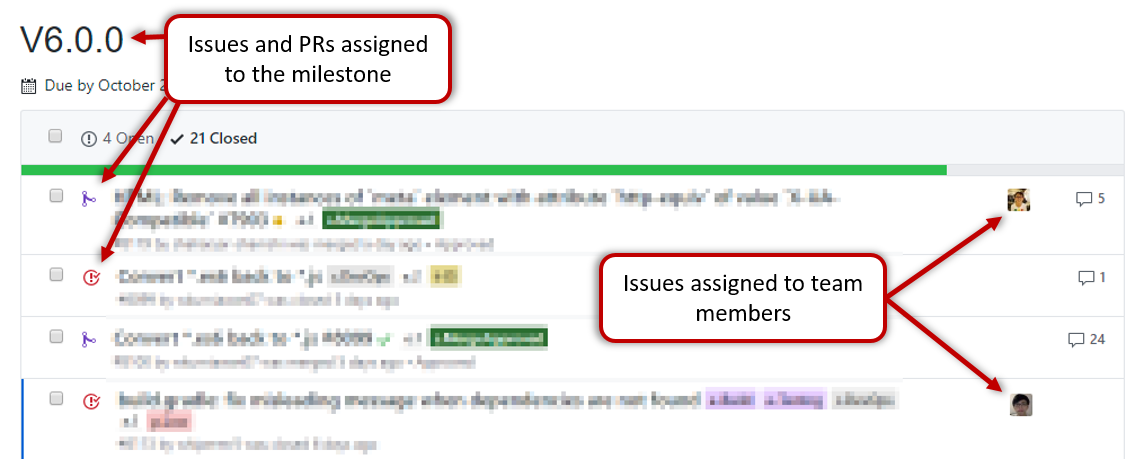
- Update the milestone to match the product i.e. all issues completed and PRs merged for the milestone should be assigned to the milestone. Incomplete issues/PRs should be moved to a future milestone.
- Do a release (example), if required by the milestone.
- Close the milestone.